Showing posts with label diy. Show all posts

Friday, September 30, 2011

DIY Autumn Wreath

Hey there, friends!

I hope you're all having a lovely Friday so far! It's a gorgeous day here in Franklin, TN and I'm excited that it's starting to feeling like fall outside! Autumn is always the beginning of my favorite time of year. It's so cozy and comforting and is the perfect introduction to the Christmas season (which is the most wonderful time of year!)

There's something about this season that makes me both want to make something crafty and to work to create an inviting environment at home. So, last weekend I thought I would combine both of those desires and make an Autumn Wreath for our front door!

I searched the aisles of Target and browsed online for Autumn wreaths to purchase, but I just couldn't find one that I liked. After looking at lots of Autumn craft ideas on Pinterest, I was inspired by these two wreaths to make one of my own!

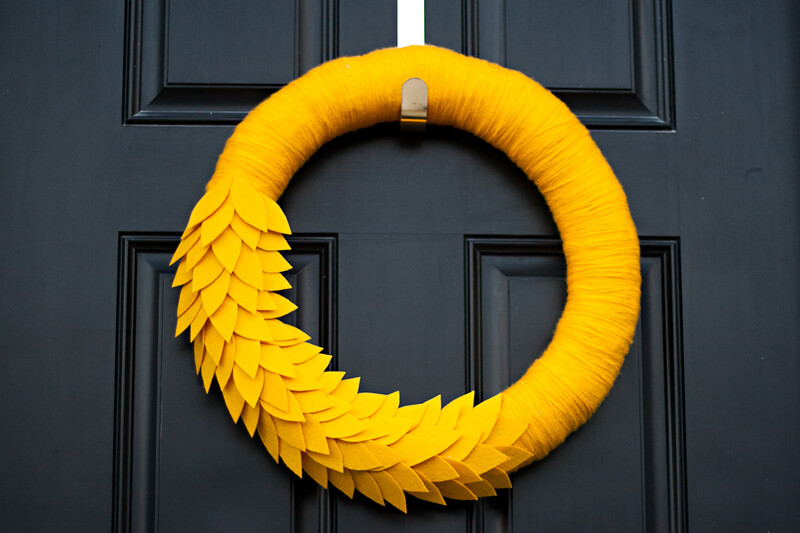
Here's the finished product...


I didn't take step-by-step photos of the process, but it's pretty easy to do!

This is what you'll need:

  • Wreath form - I used a large straw wreath form, and left the plastic wrapping on it
  • Yarn - I used 1.5 skeins of yellow yarn (but my yarn was a little thinner than some, so you might be able to get away with less)
  • Felt - I used two large sheets of the stiff felt that was next to the not-so-stiff craft felt. (haha, I'm not sure what the technical terms are...maybe you veteran crafters can correct me?)
  • Hot glue gun
  • Hot glue sticks
  • Scissors
  1. Take your yarn, and hot glue the end to the back of your wreath form. 
  2. Wrap the yarn around and around and around. (This step can be very time consuming...approx. 2 hours...so I found it helpful to watch something delightful, like Newsies, while I was wrapping away.) Don't worry about being too perfect with this. My perfectionist self was way too precise to start off with, but as I went along I got more lazy and it still looked about the same.
  3. Continue to wrap until your entire wreath form is covered! You may have to cut the yarn and re-glue a new piece, and that's okay! Just make sure to always glue on the back of your wreath form.
  4. Take your stiff sheets of felt and sketch out a leaf. Cut out that leaf, and then use it as a guide to sketch out a bunch more!
  5. Cut out your leaves.
  6. Hot glue your leaves onto your wreath.
  7. Voila! You have yourself a neato Autumn Wreath.
  8. Pat yourself on your back and go hang up your wreath smiling with satisfaction at a job well done!
Here's a glimpse out our doorstep. It looks much more welcoming than when we first moved in, which makes me happy. 


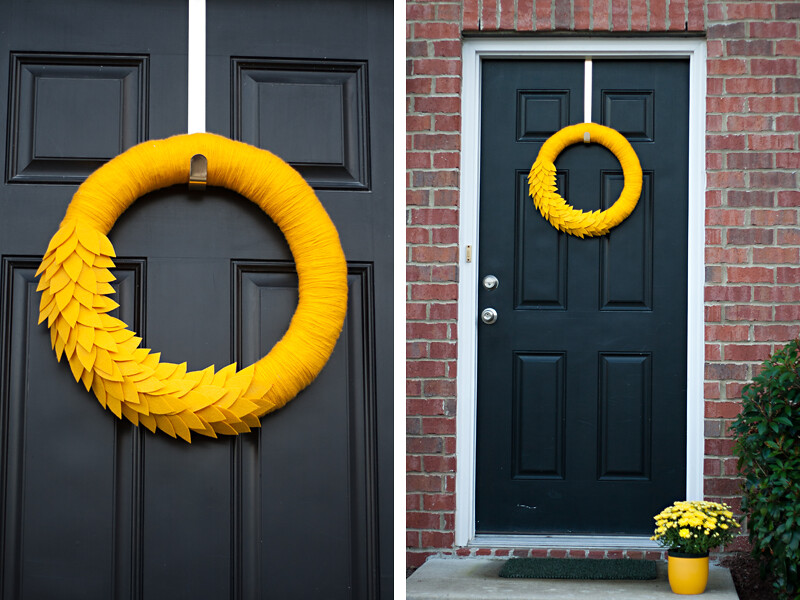
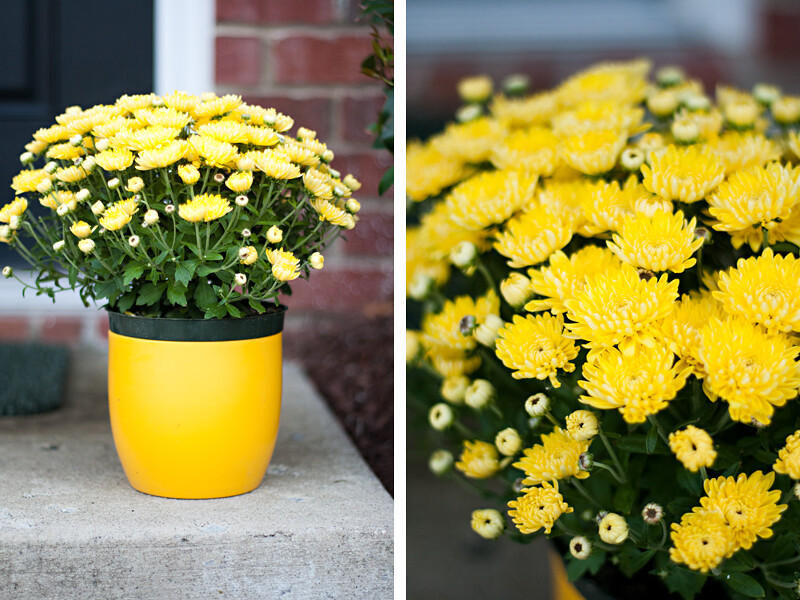
Husband bought me those yellow mums yesterday. I love them! 


Now all we need are some pumpkins...and a welcome mat! One like this, perhaps? Welcome mats are yet another thing that I have a hard time finding ones that I like. They're either blah, not our style, or too pricey. I may just have to make my own!

If you have any questions at all about making your own wreath, please don't hesitate to ask! And if you make your own, I'd love to see! Feel free to post a link in the comment section.

Have you made any Autumn crafts lately? Please do share.

Happy Autumn Day to you!

-Tiffany

Friday, December 4, 2009

friday finds!

Hello friends! I hope you all are having a very happy Friday. :) This weekend I'm looking forward to doing lots of Christmassy things, such as go to the Nashville Christmas Parade with husband, wrap gifts, and maybe bake some cookies!

Here are some fun finds from around the web this week:

The very talented photographer, Max Wanger, has recently opened up a shop where you can purchase merchandise featuring some of his images. I love love love this shirt below.

{image by Max Wanger}

These Holiday Lights Gift Tags by Kristina are so cute. You can download the free pdf to make these here.

{image via Creature Comforts}

This DIY coffee stencil is just too sweet! If Jonathan and I made lattes, I would totally want to make one of these to decorate our foam every morning. :)


As I've mentioned before, I am such a sucker for cute packaging. This season especially, there are so many pretty things that you can use to wrap up your holiday gifts. I'm loving these beautiful Holiday Gift Packaging Solutions by Nice Package.

{image via Nice Package}

I've always wanted to learn how to do calligraphy, and someday maybe I'll actually do it. Jordan Ferney made a great calligraphy tutorial over at Project Wedding. Now I'm tempted more than ever to go buy the supplies (which only cost $10!)

{image via Oh Happy Day!}

Have a very lovely weekend! :)

Tuesday, November 24, 2009

diy felt leaf garland tutorial.

When I saw this handmade felt leaf garland by Elsie, I knew that I had to figure out how to make one for myself! I love festive decorations, and thought this would make a fun addition to our Thanksgiving Day decor.


The materials you'll need:
  • three (or more depending on how long you want to make it) sheets of felt--I got mine at Wal-Mart in the kid's craft section for just $0.25 each.
  • yarn
  • marker or fabric pencil
  • scissors
  • crewel needle (it has a larger eye for the yarn to go through.)
  • needle threader

To start things off, I hand drew a little leaf...then, I cut it out to use as a guide to draw out the rest of the leaves. I drew about 10 leaves on each sheet of felt (for a total of 30 leaves.)


Next, I took my yarn. Cut it to the length I wanted it. And then pulled the yarn apart into two separate groups of two strands. (I hope that makes sense...if not, here's a picture for you below.)


Now it's time to thread the needle. I use a needle threader, because I just don't have the patience to thread that needle without it. :) Make sure to tie a knot at the end of your yarn.


Then start stitching away! Don't worry about it being in a perfectly straight line...I kind of like the imperfect look of it.


Once you've stitched one leaf, you overlap another leaf on top of it and sew it into place. Stitch & repeat. (I alternated my leaves--red, orange, brown--but you can do it randomly if you'd like.)


Just keep stitching until you've reached the desired length for your garland. And, VOILA! You have yourself a pretty little Thanksgiving garland that you can use year after year. :)


{all images by me}

This little project only cost me $0.75 and took just an hour of my time. Plus, it was super fun to make!

Tuesday, October 13, 2009

diy: laptop cozy

Ever since I got my laptop at the beginning of this year I have been looking for a laptop sleeve that I like. Most of the ones that I've found have either been too big, bland and boring, or way too expensive.

But today I came across this laptop cozy tutorial via design*sponge, and I think it could be the perfect solution! This is a no-sew project {made out of felt and velcro dots}, which is great if you're like me and don't own a sewing machine.


{images via design*sponge}

I'm adding this to my diy project list. If you'd like to see the complete tutorial, head on over to design*sponge.

Happy Tuesday!